
Thinking about building a floating deck? It’s really easy and something you can definitely do yourself. Chris and I built our 10’ x 12′ floating deck in two days a few years ago on a beautiful June weekend.

In case you’re thinking of building your own floating deck I’ve put together all the details on how we did it. I hope you find this helpful and don’t forget to show me pics of your finished deck!
Make sure before you build your deck you check with your local municipality. You may be required to use different measurements than what we’ve used (space between joists for example) or you may be required to get a permit.
The materials and measurements listed are for the size we built. Obviously these instructions can be adjusted if you want to build a deck that’s a different size!
Floating Deck Materials
- 12 Deck Blocks
- 4 – 10′ 2 x 6 Brown Pressure Treated Wood (for beams)
- 10 – 14′ 2 x 6 Brown Pressure Treated Wood (for joists)
- 1 – 8′ 4×4 (for posts)
- 1 roll of Landscape Fabric
- 1 box of Landscape Staples
- 12 Hurricane Ties & Screws
- Joist Hangers
- 1 Small Pail 3″ Galvonized Nails
- Hidden Flange Joist Hangers & Screws
- 26 – 12″ Deck Boards
- 1 – 14″ Deck Board (for border)
- 1 Box Deck Screws
Never build a deck before? I’ve also put together some of deck building tips from when we built our big deck!
Set the Deck Footing Placement
Use spray paint to mark the placement of each footing – trace an area slightly larger than each footing to show where to dig.

Our footings were placed equally within our 10′ x 12′ rectangle and we allowed for a 12″ overhang along the edge where our rim joist would be installed.
For each footing dig down about 3-4 inches keeping the sides of your hole as straight as possible. Depending on the how rolly-polly your backyard is you may have to dig some a bit deeper to keep the deck low to the ground.

Once you’ve dug your holes fill the bottom with a small amount of pea gravel and compress with a tamper (or by dropping one of the deck blocks a couple of times).

Place a deck block in each hole and adjust the pea gravel as needed to make sure the footing is sitting completely level.
Cut your posts to make everything level

Once all your footings are in place (and level) it’s time to add your beams. Pick one corner as your starting point and decide how high you want the top of your deck to be.
For us, we chose the southeast corner which is our highest point. In this corner our deck block was positioned so that the 2×6 beam could sit right in the footing almost at ground level.

Working from your selected corner cut 4×4 posts to sit in the footings and hold the beams level.

Make sure ALL the posts are level with each other (across the width and length of the deck).
Weed Control

This is totally optional but if you have a lot of grass still under your deck you might want to put down a layer of landscape material. This will prevent weeds from growing up through your deck. We used landscape staples and leftover gravel to help hold the cloth in place.
Install beams on top of posts

Once all the posts are cut and in place it’s time to install the beams. The beams rest on top of the post and are attached with hurricane ties and special screws.
Use joist hangers to keep the deck at ground level
Mark the placement of all of your joists – in our area we need 16″ between. To make installing your joist hangers a bit easier cut a small scrap of 2×6 and use it to figure out the placement of your hangers. Make sure all your joists will be flush with your beams.
Use a mitre saw to cut all your joists and install into the hangers. Your joists will not all be the same length so go one at a time and measure carefully!

I find that cutting and installing the joists is the most time consuming part of the whole deck building process. It’s great if you can split that tasks with a partner. Chris and I try to get into a rhythm where I measure and make the cuts and he installs.
Because we built our deck close to our fence we didn’t have a lot of space to install one of our rim joists along the end of the beams. Instead we had to use special joist hangers called Concealed-Flange Joist Hangers. This might not be necessary for you depending on where you are installing your deck. If it’s going to be open on both sides you can install 2 rim joists.
(also, you might not actually be able to build your deck so close to your fence so make sure to check your local by-laws before doing this)

The rim joist(s) are the last pieces for you to install on the frame which you attach to the end of the beams using deck screws. We recommend pre-drilling holes for these to prevent any splits. Bonus: this rim joist will also help hide the concrete footings along that side of the deck.
At this point the framing for your deck is done (high five!) and from here on out things should go pretty quickly.
Finish everything up with deck boards

Starting at one end of your deck, figure out the placement of your first deck board. It should run in the same direction as your beams so you can attach it (using deck screws) into the joists. Double check the board is straight before you install it! Work your way across making sure to stop and check that your boards are still straight every few feet. Make adjustments as you go if needed.
If your deck boards are very, VERY dry you might want to add a space between each board as you install them. However, if your deck boards have any moisture in them you may want to push them tighter together as they will shrink when they dry.

Once all your deck boards are installed use a circular saw to trim the ends in line with your rim joist. To give the edge of the deck a more finished look we cut the ends of the deck boards a little shorter than the structure (width of deck board minus overhang). We then created a border using a deck board and mitred the corners.

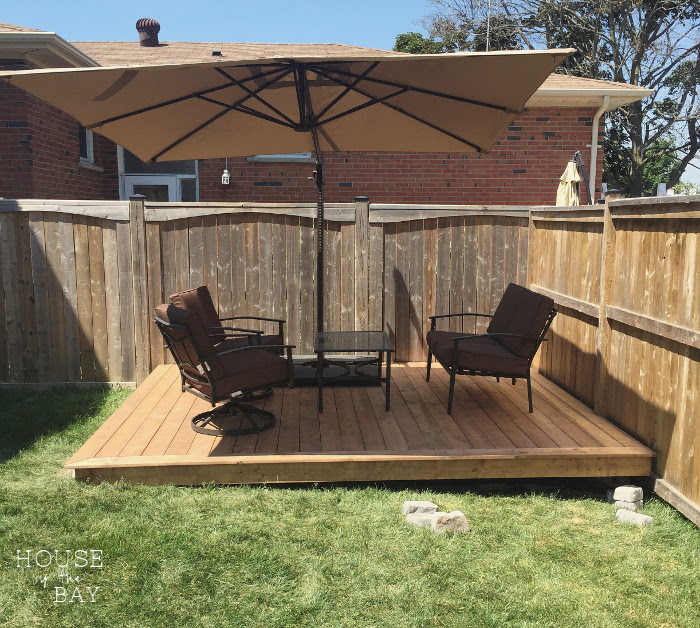
A couple of weekends later Chris went back and added some skirting around the sides of the deck which help to prevent critters from getting under it (and gives it a nice finished look).

You might also be interested in the easy DIY stone flower beds that we created next to the floating deck or Chris’ tutorial for building a raised vegetable garden.

This post contains affiliate links, you can find my full disclosure statement here.
i love this! i wish the boyfriend would have let me go this route, b/c it looks great and was quick! enjoy your new space!
b
Thanks so much! It is a super quick build and it’s nice that it’s not a permanent structure 🙂
Amazing!! Thank you for this step by step visual. I’m planning on a 20×24 exactly as you’ve done here!!
So how has the deck held up? Still sitting mostly level, or did you have a lot of settling?
Planning to build a similar deck in our yard, so just curious for an update.
Nice work, it looks great!
Hi Frank! The deck has held up really well. We didn’t see any shifting after it’s first winter and so far it’s looking good this year 🙂
I love this…Going to start to build soon one week-end. Will send a before and after.
Good Luck! It really is a fun and satisfying project ?
Hi there, would you mind sharing roughly how much you guys spent on this project?
Hi Jamie! I think we spent about $500 on this deck 🙂
?? awesome on the price!!
Our floating deck is old but used composite material. The wood was not staggered and now it’s sagging in front middle. Also I want to clean under and check for ants which I see more of on deck. How to fix sagging and cleaning under
Love this plan!! Thank you!! Do you remember the thickness of the boards you used? Would you still recommend the same boards used?
Hi Katy! We used the MicroPro Sienna deck boards, I think they are 5/4” 🙂
This gives me the courage to replace our existing deck with a floating one. Thanks for the tips and advice!
Would this design support a large spa 8×8 it will way roughly 4,000 lbs.
How many joist.hanges did you use?
Hi Stephanie! We used ~48 joist hangers for this deck.
Thanks for sharing
It is really cool when you can make a floating deck
Hey there, I would like to thank you for such a detailed explanation above. Really helped me in deciding things, and I am in the process of building one.
Even I am building one on an uneven surface which makes it cumbersome to cut skirting pieces of different sizes. So wanted to ask you, is there any easy way you did that ? or simply had to do it one by one ? Also, are the skirting pieces flushed to the ground or are they inserted into the ground ?