
Let me just say…making these DIY bookcase doors for an old IKEA Billy was as simple as I expected. It was actually one of those projects where everything seemed to go wrong. But, in the end, I’m really happy where they ended up and now I kinda want to build another set.
When I set out to build these bookcase doors I really wanted to use cane webbing. I had seen a lot of pieces with cane when I was at Las Vegas Market and really loved the look. Unfortunately it was impossible for me to find any cane (and for a reasonable price) during the beginning of the pandemic lockdown so I had to come up with a new plan.
If you want to read all about my first (failed) attempt at these doors you can read all about it in my week seven update from the One Room Challenge.
Now you might be wondering “Casey, why are you bothering to build your own doors when you can just adapt the doors that Ikea sells?” Great question my friend, great question.
Our Billy bookcases are 36” which is wider than the ones currently sold at Ikea. I have no idea how long ago this size was discontinued, but they are made from solid wood (not plywood or particle board) so I’m guessing it was a while ago.
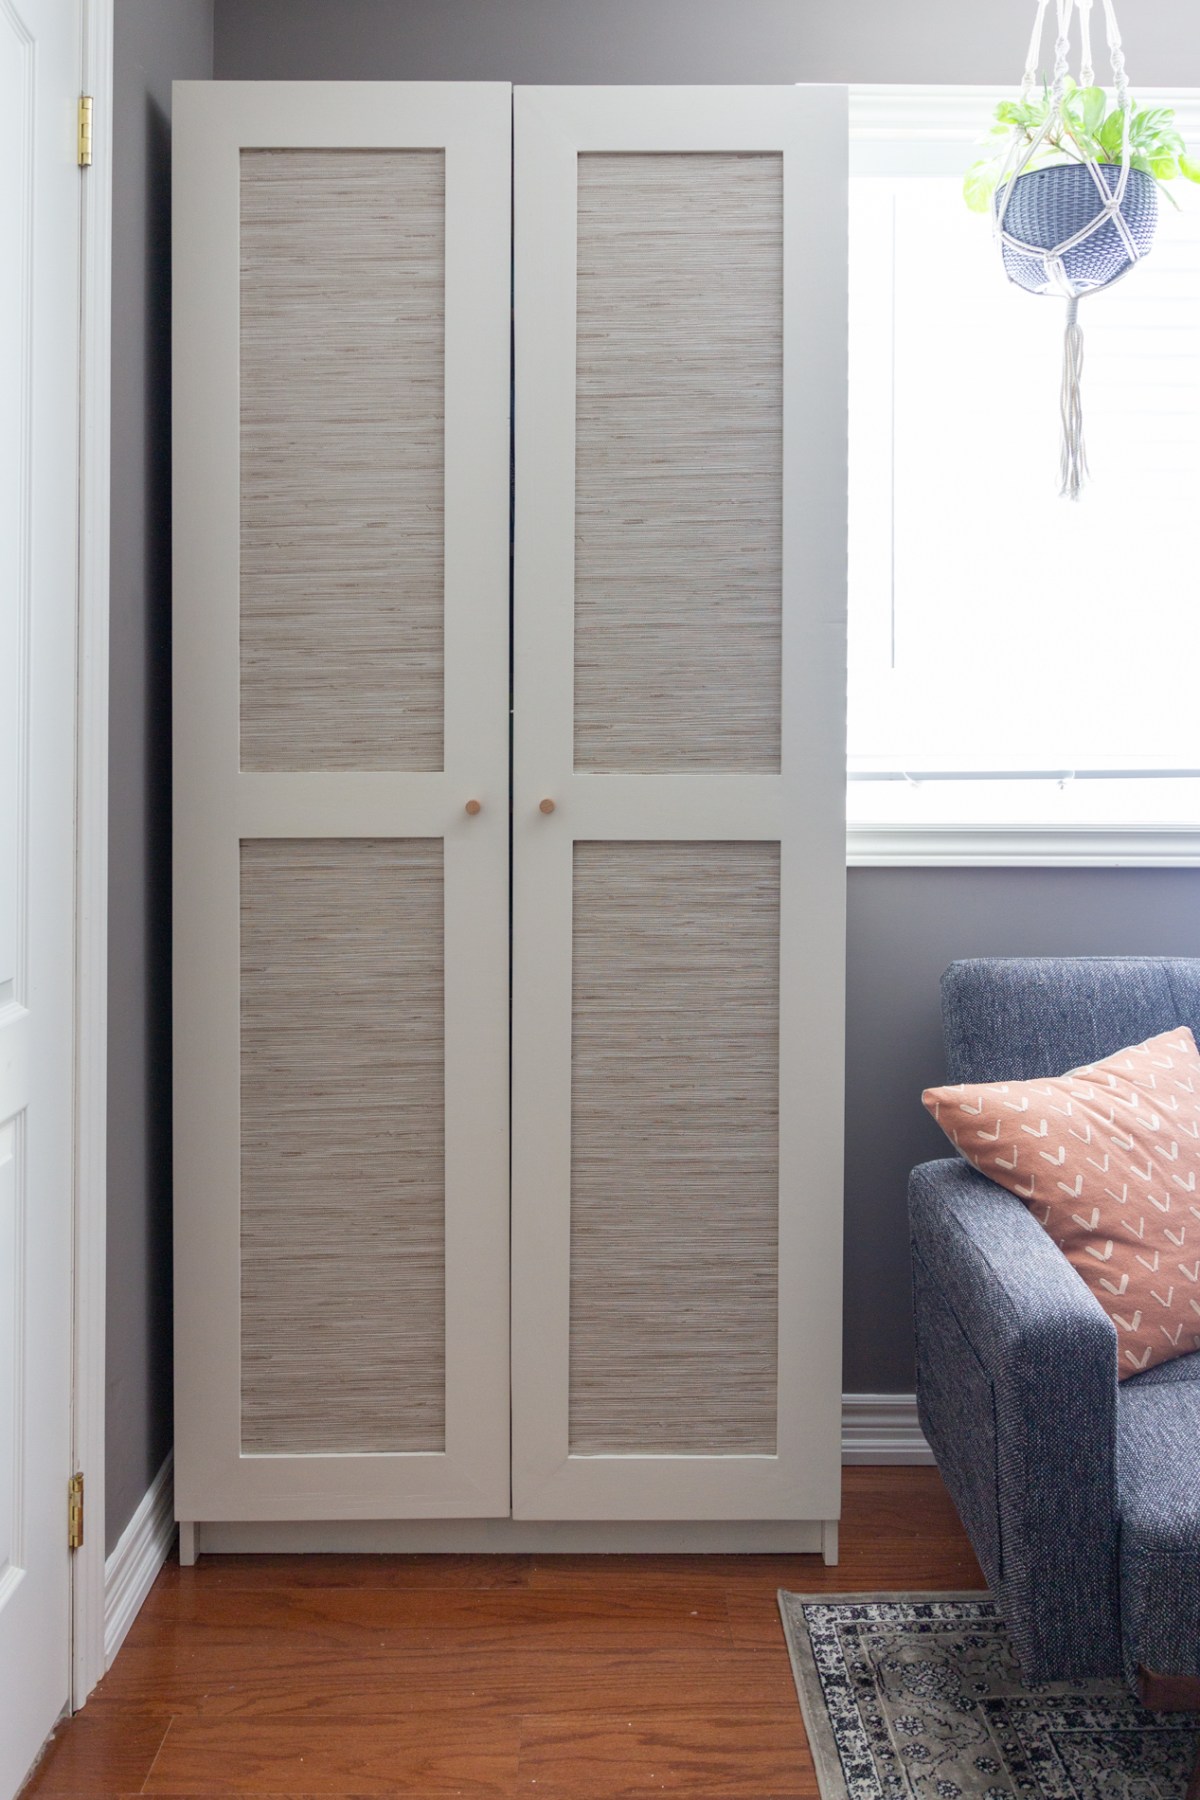
How to Build Your Own DIY Bookcase Doors
Chris gave me the concept for my second attempt at these doors and they were fast and pretty easy to whip up. These are all the materials and tools I used to create these doors.
Materials
- 1 x 4 x 8 Select Pine Boards (as straight and smooth as possible)
- 1/4″ Plywood
- Grasscloth Wallpaper
- 2 packs of hinges
- Tacky Glue and a Foam Brush
- Primer (my favourite)
- Paint
- Small paint roller (or a paint sprayer)
- Your Preferred Hardware
Benjamin Moore Advance paint is my go-to for any furniture project. Read more in my in-depth guide to painting cabinets and furniture.
Tools Used
- Mitre Saw
- Speed Square (not required, but super helpful)
- Router
- Router Table
- Upholstery Staple Gun
- 3/8″ crown staples
- Table Saw or Circular Saw
- Drill Press/Electric Drill & Forstner Bit (size based on hinges)
Creating the Door Frames
First I cut 1×4 select pine boards with 45° mitred corners to the correct length for the outer frame of the doors. You will also need two cross pieces with 90° for the centre of each door. The measurements of these will really depend on the size of your bookcase.

Chris set up the router table and routered a channel about ½’ in from the inside edge and 3/8” deep for plywood panel to sit in.
Pro Tip: In hindsight it probably would have been better to make a slightly shallower channel – the deeper the channel, the shorter the staples you will have to use to attach the plywood panel to make sure they don’t poke through the front of the door.

If you will be using a drill press, I recommend drilling the holes for the hinges following their instructions at this point as it is easier to manouver the single pieces rather than the assembled door.
Using wood glue and clamps I attached all the frame pieces together including a cross piece in the middle of each door that was routered on the top and bottom.

When the frame was fully assembled and dry, I filled all the seams with wood filler and sanded everything smooth. Before priming and painting I measured the final size of the opening for the panel, cut my 1/4″ plywood to size and dry fit the pieces. You could also drill for the door hinges at this point if you are going to be using an electric drill.
Prime and Paint the Bookcase Doors
I used some small roller brushes to prime and paint the doors. If I wanted a more professional look I would have used my paint sprayer but the set up and clean up takes so much longer it didn’t seem worth it. While waiting between coats (16 hours for this paint!) I primed and painted the outside of the Ikea bookcase.

Ideally, you would then want to wait a few weeks after painting to do anything else with the doors or bookcase to allow the paint to fully cure (harden). But…because this was a One Room Challenge project I didn’t have that kind of time. If you do not wait it is much easier for the paint to chip off and you will have to go back and do touch ups later.
Assembling the Grasscloth Panels
While the paint was drying, I glued on the grasscloth wallpaper onto the plywood panels using a foam brush to spread the glue.

Wallpaper paste might have also worked for this, but I didn’t have any on hand. I did try spray adhesive and Mod Podge but the tacky glue worked the best in my tests. A peel and stick wallpaper would also work.
Once the glue (and paint) was fully dry, I installed the panels using my small upholstery staple gun and some 3/8″ staples.
DIY Door Installation
The hinges we used did not have great instructions for placement inside the bookcase so that took some trial and error, but in the end the doors went up and the adjustable hinges made it easy to make them sit pretty straight.

We did discover after these doors were built that our mitre saw was slightly off so my 45° bevel was not exact – that lead to the doors being slightly off and so you can see a bit more of a gap between them than I would have liked. HOWEVER it’s one of those things that I will always noticed but really isn’t a big deal.

For the knobs, I really wanted a simple straight knob similar to the Ottawa knob from Park Studio (but not $14/knob) so I actually made my own. If you’re interested I’ll try to get a quick tutorial post put together to share next week – let me know!
What do you think? Are you planning to make a set of your own bookcase doors? I have one more of these older Billy bookcases so I might make another set – and who knows, maybe it will be easier to find cane webbing now that things have started to reopen.
